Only 3 Stitches to Learn!No fussy 1/4 stitches, no combining colors, just the fun stuff! Download these instructions in PDF format Instructions in Spanish |  |
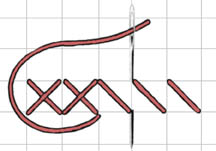 |
1. Basic Cross StitchAlways have your top stitch crossover in the same direction and keep the tension even on every stitch for a smooth appearanceOne stitch at a time Create your first stitch coming up from underneath your fabric in a bottom corner of a square, cross diagonally and return your needle through the opposite upper corner. Next, come back up from underneath your fabric at the opposite lower corner of the square and then again, cross diagonally and return your needle into the opposite top corner. Continuous rows of cross stitches Ideal for a smooth look First make the bottom half stitches across in a row then go back, crossing over the first row. (see diagram on left) |
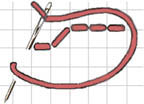
2. Back StitchUsually used to outline an object in a contrasting color or used in lettering Come up from under, one row ahead of the start point then bring your needle back to and into the start point. Skip a row underneath, come back up and go back through the last point you had previously come up. Continue following pattern, usually one square at a time. |
 |
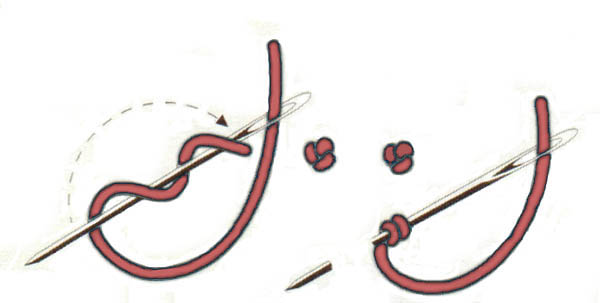 |
3. French KnotCreates periods at end of sentences or accents Bring the floss out of the required position, hold the floss down with the thumb and encircle the needle two times. Still holding the thread firmly with your thumb, pull up and gently allow a knot to form to desired size at the top of your fabric. Return your needle into the fabric back one row or ½ row, past your starting point and insert it. Pull gently as not to pull entire french knot through to the backside. |
Let's Start Stitching!The Joyful Expressions designs are charted for 14 Count Aida cloth or 28 count Linen or Evenweave (cross over two strands). 14 count Aida has 14 obvious squares to every inch, while 28 count fabric does not have obvious squares giving a more elegant look where the fabric is left exposed. A size 24 Tapestry needle is ideal for 14 count Aida. The blunt point slides through your fabric without catching on a thread. You will want a piece of fabric larger than the finished design. A good rule of thumb is to add at least 1-2 inches of fabric per side. You may want to use a hoop or frame or Q-Snaps® to keep the fabric taut while working your design. Another helpful aid is a magnet board with magnet bars to hold the chart. The magnet bars can be used help keep track of where you are on the pattern. Working top and down works better than bottom and up for most stitchers. Stitch in good lighting and always wash your hands before starting. To determine where to start, you can either locate the center point of the fabric and chart or since you know the finished size of the design based on your fabric count, you may start from the top left and work over and down. The chart is designed for 14 stitches per inch and is graphed for you in squares of 10 x 10 stitches. All your cross stitches will be created with two strands. The floss skeins come in six strands so you will need to "separate out" strands. Backstitches are usually single strands unless specified, such as lettering. The Joyful Expressions charts include a floss key referencing DMC and Anchor floss. Based on the chart and the color number, locate your starting color floss. Knotless stitching - cut one strand at twice your comfortable stitching length. Fold the strand in half matching the ends. Thread these ends through the eye of the needle leaving a loop on the other end. Start your stitch up from underneath your fabric and create your first ½ cross-stitch on the topside of the fabric being sure not to pull the thread nearly through. Turn the fabric over and you will see the loop of thread on the backside. Pass your needle through the loop and pull the thread all the way though until the loop and thread lie snug against the fabric. To end a color, finish off on the backside of your fabric by sliding your needle under several previ-ously made stitches. Repeat until secure and snip off. See, no knots! Work your cross stitches the same way each time. If your top cross stitch runs diagonally from bottom left to top right, continue this process for all of the cross stitches in the piece. Try to keep a consistent tension throughout thus creating an even appearance. If you have a row of one color, stitching just the bottom diagonals across and working back with the top diagonal cross stitches, looks smoother than creating one complete stitch at a time. Avoid spanning more than four rows or columns to continue a color in another location, especially if the fabric is sheer as the "back threads" may show through. The Joyful Expressions designs have been test stitched, taking care to provide easily identifiable symbols and to group colors so that there are fewer color changes and no "strays". Many of the designs fit standard off the shelf frames such as 5 x 7 inches or 8 x 10 inches - No custom framing necessary! Watch the Yarn Tree Instructional Video How to create French Knots from Mary Corbet atwww.needlenthread.comFinishingAfter you have completed all your stitches, examine your piece. If the fabric is soiled, you may hand wash the piece with a mild detergent and allow to air dry flat. Iron your piece placing a damp pressing cloth (a pillowcase will work) over it. Let the steam take out any creases without flattening your work. While the fabric is damp you can slightly stretch your fabric into a more perfect square or rectangle if necessary. Clip away any excessively large knots and loose threads. Cut a self-adhesive mounting board slightly smaller than then opening of the frame. Fold your finished piece around the mounting board and hold it up to the light to better center it. When it looks great, iron the edges under the board for a crisp look. For cleaner less balky corners, trim away excess fabric at right angles, about 1/2" (1.27cm) off the corner (miter). Peel off the protective back of the mounting board and center on the backside of your piece. When you are confident that you have your piece centered and squared, press (by hand and then by iron) your fabric onto it. You may need to tape down the fabric on the backside. Most of the newest Joyful Expressions designs fit in standard off the shelf frame sizes such as 8 x 10" or 5 x 7". In most cases you will want to leave out the glass, not only for a better fit, but to show off the attractive texture of your stitches. Display your finished piece where it will be a constant reminder of our Lord's Word and Truth - a blessing to all who view it. |